Sunday, October 12, 2014

Water Kefir

Water Kefir. Tibicos. African Bees. These are all the names for the same bacteria and yeast colonies used to make water Kefir. You may never have heard of water kefir, only knowing about it's more famous cousin, milk kefir. But like it's more gad-about cousin, water kefir is a wealth of gut healing, happy tummy making probiotics. Many folks drink it to replace soda in their diet. I like it because it tastes really good and gives me a probiotic boost at a fraction of the cost of probiotic supplements. It is also a great creative outlet for my disposessed chef. I can play around with flavors for pennies.
 Here are the water kefir grains. They look different from the milk kefir because these grains eat sucrose/glucose instead of lactose, which is eaten by the milk grains. They look like the crystals you make smelly jelly from, or use to hydrate very dry garden soil. My husband had a less charitable analogy, something made by Walter White. These are rehydrated grains I bought from Cultures for Health. Their website has great information on water kefir and how to rehydrate and use it. Basically I soaked the dehydrated grains in a sugar water solution for 3 days then poured the sugar water off. My kefir was now ready to get to work.
I made up a new sugar water solution and when it was room temp, I added the grains to it, put in a slice of lemon because it gives it a nice flavor and Dom Anfiteatro, the Kefir Guru of the WORLD said to. Then I let it sit for 2 days.
After the 2 days, I strained the grains out and put the liquid into flip top bottles. I added elderberries to one bottle and hibiscus flowers to another. Then I let them sit out for another 24 hours, burping them every 10 hrs or so.


After the 24 hours I strained the herbs out and then drank the kefir. It was yummy. I liked the elder, but I really liked the hibiscus.
this pix above is elderberry water kefir.
 And there you have it. Homemade, healthy soda-like drinks. I'm going to keep experimenting with different flavor combinations. It's fun to see what tastes good and what is nasty. Nothing nasty so far.


Here is a recap of the recipe:
4C filtered water
1/4C sugar
10 drops liquid minerals
slice of lemon
3-4 T water kefir Grains.
Boil water, add sugar to mason jar and add boiling water to disolve. Add filtered water to make 4 cups. Let cool to room temp. Add in grains and lemon slice. Cap with an airlock cap and let sit for 24-72 hours at room temp. The higher the room temp the quicker the kefir will ferment.
 How do you know when it is ready? Give the kefir a taste and if it is significantly less sweet than when you started, you are good to go. If not, let it sit a little more.  Drink water kefir plain if you like but most prefer to ferment it for a second time with flavorings. Add desired flavors, Fruit fresh or dried, spices or extracts to individual swing top bottles and let sit out for another 24 hours, burping the bottles every 12-24 hours depending on the temp and the sugar content of the flavoring. More sugar, more burping. After 24 hours toss the bottles in the fridge and let cool down. To enjoy one of these bad boys, open carefully over the sink in case there was excessive carbonation and it volcanoes all over the place. You might even want to put the second fermentation process in a cooler or other container. I had a bottle burst at 3 AM filled with elderberries. I was awoken by a loud POP and found Glass, berries and liquid all over my kitchen. Not a very fun time. But you will be much smarter than I. I can tell that already.


Wednesday, October 8, 2014

milk kefir!


Milk Kefir!  For my next installment of jarred weirdness I present to you a dairy delight. Fermented milk kefir. I was introduced to this elixir again by Susun Weed in 1994. She had these things called Tara or Tibetan Mushrooms sitting in this thick, viscous jar of goats milk.  After straining out the grains as they are called she poured me a small glass of the tart, sour stuff. It glided down my throat with a slight effervescence. It tickled my nose and I burped and fell head over heels in love. I'm a dairy hound anyway and this new way to get my lactose fix had me over the moon. I believe that diary can be a good human food for many people. Some react poorly to it but many can process it just fine and get great benefit from it's nutritional profile. I can't drink fluid cows milk straight but I can drink goats milk and cultured cow milk products just fine. Milk kefir really tastes great to me and has so much to offer health wise. After leaving Susun with a gift of grains I fermented them at home for quite some time until either they got thrown out by accident or pitched when we moved. I was still curious about kefir so I did some research. This was the dawn of the internet, the days of alt.net groups and spider searches so it took me some time to find what I was looking for but find it I did. I found the MOTHERLODE of information about Kefir in the webpages of one Dom or Dominic N Anfiteatro, a Kefir Guru from Down Under. This was about 1999 and I had found a man obsessed. His love of kefir had produced the most comprehensive site of information on the stuff ever collected. Dom's site was the go to place for information about kefir. History, Cultural relevance, recipes, techniques were all collected on Dom's site. He also had links to find folks to share grains around the world. I could repeat what I found but that would deny you the delight of perusing his pages. It has grown into an amazing, labrynthine treasure trove of information and I am in awe of the love and dedication to Kefir and things fermented Dom has shared with the world. Now days you can find milk kefir on sale at regular grocery stores touting it's probiotic goodness. That's wonderful, more people can get to know about this wonderful food this way but often the stuff you can buy is full of things I don't want to eat; sugar, artificial colors, gums and stabilizers. And of course, it's expensive. I can make my own kefir at a fraction of the cost of store bought.
Here are the kefir grains. They are not grain based but a combo of yeasts and bacteria that eat lactose and poop out lactic acid and various other probiotic goodies that are great for the human gut. If you are curious about the composition of Kefir click here .  You let the milk and grains mingle at room temp for about 24 hours then strain the kefir off, eat the liquid and use the grains for your next batch of Kefir. They will keep making you kefiry goodness for years with loving attention.

Above you can see the kefir sitting out fermenting. The grains are in the top photo processing the milk. in the bottom photo you can see the separation of the milk proteins from the whey after sitting for 24 hours. After straining I am left with this creamy, tart, thick liquid. I refridgerate mine and drink in smoothies or plain. Sometimes I strain the kefir through a fine weave cloth and make labneh cheese but most often I drink it .
 To get your own kefir grains you could check out Dom's sharing page, go to Facebook and look for Kefir sharing groups or do a web search for companies that sell kefir grains. I am familiar with Cultures for HealthGEM cultures and Happy Herbalist. There are others. eBay might be a fruitful place to check.
To recap, making kilk kefir is stone easy. Obtain kefir grains. put them in a jar and fill the jar with about .5-1 C milk for each T grains or according to the package instructions. Cover jar with a cloth and rubber band to keep the creepie crawlies and flying bugs out. Let sit at room temp (60-80) for about 24 hours. The warmer the room , the faster the ferment happens. Strain the milk off with a plastic strainer ( ideal) or a Stainless Steel one if that's all you have.  Place the strained grains back in the jar and cover with fresh milk and repeat. Some folks will close the jar and let it sit out for another 24 hours at room temp for a second fermentation which decreases the amount of lactose left in the kefir and increases the vitamin profile. I think it is too sour that way so I just put my jar in the fridge straight away.
 Enjoy your kefir however you would eat yogurt. Enjoy!


Saturday, October 4, 2014

More on Kombucha

I first had kombucha at the amazing Wise Woman Center in Woodstock NY run by the indefatigable Susun Weed. There on the counter was a bucket with this evil looking blob floating in a brown liquid that smelled like vinegar. I thought it was a vinegar mother, the bacteria colony that makes vinegar. But a sign said kombucha. I wondered what kind of cha, or tea in Japanese, could be made from Kombu, a type of seaweed. I sure didn't see anything it that murk that looked like kombu. Susun said it was not kombu but a fermented tea of Red Raspberry leaf and spearmint. It was a thing handed down from grandmother to daughter for at least the last 1000 years and it was good for the gut and the immune system. I could attest that it looked handed down for a thousand years. It was spooky looking. There was this huge, flat pancake looking thing floating in liquid surrounded by tiny bubbles. "Have a sip" she said. I'm not one to shrink away from a challenge and I have always said I'd try any food so long as it was not alive going down my throat, so I said "ok." This batch was aged so it was vinegary. Not unpleasant, just sharp and ever so slightly effervescent. I enjoyed it. On my departure from the center 6 weeks later I was armed with a baby kombucha mother and some Tara grains. More on that later. I kept brewing the kombucha tea at my home. Each batch made a new colony that I gave to friends and co workers at the pharmacy I worked for. One day I got a call at work from the local newspaper. The reporter had heard I was making this weird brew that some folks were calling a health miracle. She wanted to see it and interview me. I made no claims that this stuff was a health tonic. I have always asserted that it was a tasty self replicating brew that has been around for at least 1000 years. This was 1995. I got in the paper and became know as the kombucha woman at the Pharmacy. The next year I moved from WI where I was living to MD then to TX and I gave up my beloved Kombucha. There was no way I could keep up with the upkeep the brew needed in my new living situation. Besides, the FDA was telling folks that Kombucha was dangerous. I knew that it was not dangerous if you didn't drink gallons of it at a time. Moderation. But anyway, my circumstances prevented me from brewing it for the next 16 years.
 Imagine my surprise when I saw a bottle of GT Kombucha in the local Whole Foods store in about 2009. I laughed at the price but bought a bottle anyway because I had no idea where to get a mother to brew my own. The GT stuff was good but I liked my stuff better. Then there was a crackdown in 2010. Somehow the word got out that Kombucha was alcoholic. It is fermented but it is not alcoholic, it ferments to Acetic acid, not alcohol in more than .5-,8%, no more than fruit juice sitting in the fridge for a week. After the kerfuffle died down, Kombucha was available in the store but I refused to pay the exorbitant prices for it. In 2014 I finally got in a position to brew my own stuff again. I bought a bottle of the store bought kombucha, forever hereafter known as booch, and let it sit out for a week until a SCOBY or mother grew on it and then fermented my own batch of green tea kombucha. It was like seeing an old friend. I liked the taste but looking online showed me that folks were doing all sorts of cool things with their kombucha brews. There was a second fermentation revolution going on and flavors I couldn't imagine were being created. By adding fruit or spices and herbs to the 2nd fermentation of Kombucha, amazing flavors where being produced. Since Kombucha was always about the taste first and the gut soothing properites of the brew second I was in hog heaven. This opened up a vast new arena with which I could play! And play I have! So far I have only made 2 flavored brews but I have so many ideas floating in my head. Here are pix of my latest creations, truly weird shit in jars.


Kombucha is made very easily once you have gotten a SCOBY or Symbiotic Colony of Bacteria and Yeast. You can google these online, get them from Ebay or get them from a friend. Then you make a super sweet tea solution, add the SCOBY, then wait. It takes about 7-14 days for the SCOBY to ferment the brew. I start tasting around day 6 so it does not get too vinegary. Then I pull off all but 2 C into other bottles. The plain stuff goes right into the fridge. The flavored stuff gets put into bottles( smaller re-used GT bottles) and then sits out for 2 more days then goes into the fridge. When the stuff is cooled off I drink it. Happy tummy and tongue happen.

Kombucha basic recipe
16 C water
2-3T black tea
1C white sugar
2c pre-existing kombucha 
1 SCOBY
gallon jar w spigot (or not)
coffee filter 
rubber band
Boil the water, put tea & sugar in a container. ( I use a plastic gallon pitcher from Walmart to brew). add hot water and let steep for at least 10 min. I let my stuff sit until the water is room temp. If you can't boil the full 16 cups at once boil what you can then fill the rest of the way with cool water to make 16 cups water total. Let this come to room temp. Strain and  Pour into  brew jug. Add SCOBY and pre-existing kombucha tea. Cover with coffee filter and secure with a rubber band to keep fruit flies and other nasties out. Let sit 7-14 days, Start tasting on day 6 so you can see when you like the taste. Decant into a jar and sit in the fridge. Drink 4-10 oz a day or as desired.
For 2nd fermantation, get smaller bottles. Put fruit or herbs or spices in bottles. fill with Kombucha, let sit at room temp for up to 48 more hours then refirdgerate. Twist open the tops of the bottles every 12 or so hours so that the gas does not build up and explode the jars.

Saturday, September 20, 2014

Kombucha and Kefir after the move.

Well, I'm back after our move from Dallas to Allen TX. I'm happy to report that all the weird shit I had in jars made the move without incident. Storage in this house is more limited than in the old house so I am still figuring out the best place to store my stash. Since my last post I have made several herbal oils, some Motherwort tincture and Kombucha and Kefir.


First, here is a plantain oil steeping away. This is fresh plantain leaves (Plantago Major) I bought from Pacific Botanicals steeped in olive oil I got from Costco. This will be great for the itchies I get on my back and bug bites and ant bites we get down here in Texas. It is also really wonderful to soothe the itch of haemorroids.

Next up  I have Fresh Motherwort in 100 Proof alcohol. I don't have Motherwort ( Leonurus Cardiaca) growing near me so again I purchased mine from Pacific Botanicals . This tincture is a heart supportive, anxiety calming wonder elixir. I use the flowering tops and upper stalks and let them steep for at least 6 weeks. Then I'll bottle this up and use like Rescue Remedy for anxiety. All the members of my household suffer from excessive anxiety from time to time so I am really happy to have this plant at my disposal.

My most recent exploits have been making Kombucha tea and milk kefir again. I first had both of these funky foods at The Wise Woman Center run by the amazing Susun Weed in 1994. Kombucha is a effervescent drink made by fermenting sweetened tea using this nasty looking blobby thing called a SCOBY or Symbiotic Colony of Bacteria and Yeasts. You put this other-worldly looking thing in a sweet tea solution and let it sit for about a week or two then begin to drink it. The Scoby ferments the sugar and you get this fizzy, sweet or vinegary drink that is full of great probiotic buggies to help one's gut  live a happy life.  It is fun to make this brew but you do need a scoby to get started. I couldn't find anyone locally who had a scoby to share so I went to Whole Foods and bought a bottle of kombucha and left it out for a week and it grew a tiny Scoby that I then used to ferment a batch of sweet green tea. I have always had my kombucha flavored like the tea used to brew it but this time I'm going to experiment with flavoring my kombucha with fruits and other things for the family to enjoy. As I don't want any extra sugars I'll probably stick with the plain stuff. The others have better functioning pancreas' than I do. The great thing about the kombucha Scoby is it is self replicating so it will last for years if you take good care of it.
 The other thing in jars I have is Kefir. Kefir is another probiotic food that is gaining in popularity in mainstream America. My 16 yr old likes the stuff we can get at Whole Foods. It is a tart, fermented milk product like a runny yogurt that can be flavored, made into a cheese, added to smoothies or just drunk plain. Kefir is fermented by these little blobbies called kefir grains. They get added to milk and let to sit at room temp for 24 hours and Bam, you have a mild Kefir drink. If these ferments interest you, check out some of the many video's on Youtube about both the Kefir and Kombucha. There are lots out there. I don't have a favorite one to recommend, I just see that the process is about the same for all the vid's and both products are very easy to maintain and cost effective and yummy!

Monday, June 16, 2014

Weekend's work.


I was a busy bee this weekend. My rose tinctures were all ready to decant and several other things called out to be tinctured. What you see pictured above from left to right is tumeric tincture, Almond liquor sweetened with Swerve, Slippery Elm Balls and capsules, my Dram d'Amour numero Neun sweetened with sugar and Hibiscus tincture/vodka.
My Dram d'Amour Numero Neun was a big hit at a party I attended over the weekend. This is designed as a love potion intended to enhance sensual experiences. I don't know if that was the case but everyone loved the taste of the potion. It was described as a chocolate covered cherry with a flowery punch at the end. 
Another drink oriented potion I put up this weekend is this Almond liquor sweetened with Swerve. This is going to be for cocktails and sipping instead of strictly medicinal use. Behind the almond brew is a Tumeric tincture. This will be medicine. I'm  new to Tumeric. There were these pretty roots at the store yesterday and I knew that tumeric has medicinal properties including helping reduce inflammation and aches and pains related to arthritis and some positive effect on ones heart so I thought, Why not tincture it? I look forward to learning about this pretty plant in the future.

 Here we have some chamomile preparations. The top pix is of a chamomile liquor with honey, chamomile and lemon peel. I'm interested to see how this tastes in about a week. Below is a straight chamomile tincture. I'm looking forward to the gentle, calming effects of this tincture as my family get ready for a big house move.
One Habenero pepper with seeds in here. Steeped until it hurts. In this case steeped 2 days. This is going to be part of my Atomic Margaritas.
This beauty is dried hibiscus in 50% alc. I've left this unsweetened so I can use it in cocktails and explore any of it's medicinal potential. Hibiscus is used as a cooling drink in tropical areas so a tropical cocktail would be medicinal in Dallas TX in July, right?
And these are slippery elm balls, a combination of slippery elm bark powder and honey mixed into a dough and rolled into balls. After I made them into balls I rolled some in more slippery elm powder and some in cocoa powder. These are going to be used by the whole family for soothing sore throats and my favorite use, soothing stomach upsets. I get reflux sometimes and I don't want to use a proton pump inhibitor or other acid inhibitor so I use these babys to sop up the excess acid in my gut and keep it out of my esophagus. My man uses them to calm his very nervous tummy. I like Slippery elm because it stops up those that runneth and makes move those that are stopped up.
Well that's what was going on here this past weekend. What's up with you?


Monday, June 9, 2014

Hawthorn!


My dried hawthorn berries came in the mail today, so natch, I put some in jars. The berries were smaller than I expected and had a forest-like, woody smell to them. I put up a Qt of  tincture which should last me and my man quite some time.


Then I decided to make some hawthorn syrup. I put about a cup of berries in 3 C water and set them to boil then turned them down to a simmer
As the berries were simmering away Kevin called to me from the other room," The neighbors must be smoking weed on their porch!" Then he came into the kitchen to see what I was up to and walked past the stove and exclaimed," So that's what it is. I should have known." I must admit that the simmering hawthorn berries did smell a tich canabinal. After the liquid had reduced by what I thought was half I strained the liquid into a measuring cup to find it had reduced to 6oz. Oops. Oh well, no real harm done. I then added 2 oz by weight of Swerve sweetener. Ok, take a deep breath here. I know Swerve is not "Natural" and most will object to it's addition to a herbal remedy. But I am diabetic and can't use Honey, white sugar, agave or coconut sugar without serious damage to my blood sugar control. I have tried Stevia and while I find it has some good uses in tea and less concentrated applications, I LOTHE the bitter aftertaste stevia has when used in quantity. I'm talking using the dried leaf, not the white powder which I think tastes even worse. For most of my sweetening needs I have used liquid sucralose since I need only 1 drop for most applications therefore limiting my ingestion to a small amount. But for a syrup I needed quite a bit. Swerve is a newer sweetener made from ogliosaccharides and erythritol, a sugar alcohol that does not cause gastric distress and has very little impact on blood sugar. If I could I would use honey. But I can't so this is what I choose to use.
 The finished syrup tastes pretty good. It's not something I'd want to pour all over my pancakes( which, by the way, I can't eat) but to take as a tonic by the spoonful nightly it is quite pleasant. This is an experiment, we shall see if the Swerve has any preservative qualities like sugar and honey do at syrup strength.
So, why did I do all this? Because Hawthorn berries are quite a nice cardio tonic and nourishing herb. My heart has been doing it's thing for more than 51 years now and a little assistance from Hawthorn might just help it keep on keepin' on for  51 more.  A member of my household has elevated blood pressure and Hawthorn has been known to help folks gently lower their blood pressure. Here is a nice little write up on Sister Hawthorn from my mentor Susun Weed:Hawthorn 
 I bought my Hawthorn from :Mountain Rose Herbs
and for those of you interested in finding more about Swerve and it's use as a sweetener for those who must limit glycemic impact look here :Swerve


Sunday, June 8, 2014

Elderflower

I went on a edible plant walk today. It was so lovely. It rained a little but just enough to keep the heat from being oppressive. I got to see several old plant friends and met a few new ones like white mulberry. The berries are a cream white color and in my opinion much tastier than the purple berries. There were several other plants that fell into the Could eat category but not quite want to eat category. But who to my surprise did I see? ELDER! In the 15 years I've been here I have not found Elder anywhere in Dallas. I just needed a little help to find her. It never hurts to ask for help.
Elder has multiple umbels on it's flower head and the flowerhead above was so perfect I didn't want to harvest it so I looked for more. When I found another cache of elder I took only 3 small umbels from one plant because the whole flowerhead was not totally open and I thought that the 3 I got were enough for a small mason jar. I really don't want to harvest more than I need.
 I took the flowers home and put them in a small jar and covered them with 50% alcohol. I'm not sure yet if this will be an Elder tincture or Elder cordial.
If I leave it as a tincture it will grace me with it's fever lowering abilities. I know of this ability. WebMd mentions that elder has blood sugar lowering abilities. I don't know about this but I am going to find out more on that. If I decide to make this into a cordial it will be a low carb version of the delightful and subtle St. Germain liqueur:St. Germain. Stay tuned to see how this turns out.

Thursday, June 5, 2014

Fruit in jars!

Today I saw some peaches at Albertsons that looked and smelled nice. Did I buy them for a pie? Of course not! I put that shit in jars! I think that I'm going to try brandy and peach for a batch when the local peaches come in. Anyway here is my fruit haul in all it's boozy glory.

Wednesday, June 4, 2014

Cordials!

Cordials are a curious thing. They remind me of Victorian parlors and cut lead class vessels holding all manner of liquid delights. I don't know why I think of them as old fashioned but I do. They are a sipping drink, a slow drink ment to be savored in small quantity. And with the price of most commercial cordials I can see why. Cordials pack a hefty punch to the wallet.
 Wait a minute, you don't know what a cordial is? Let me tell you. A cordial is a sweetened liquor made most often from fruits, aromatic flowers or herbs that is sipped in small quantities as a digestif or just a saut de langue (I just made that up). They are often made with neutral spirits but can be made with Brandy or even rum or tequila. Once in a while a cordial may even have medicinal properties but most often they are just to delight the tongue.
 I got inspired at the grocery store the other day when I saw this beautiful rhubarb in the produce section. I never grew up eating rhubarb and it is too hot to grow it here in Dallas so I am not too familiar with it but I know it is tart. The stalks at the store were a beautiful red hue and very crisp looking so I bought a few and decided that a tart, sweet cordial might be a fun thing to try. I cut them up to expose more surface area and made a standard tincture from them.( I covered the almost full quart jar with 50% Everclear 50% water to make an almost 100 proof solution)  Then I let the tincture sit for a week. I did the same thing in a different jar with strawberries which were on sale at the store.
I did an experiment where I put a small batch of strawberries in straight Everclear to see if I could taste the difference in infusion techniques. I would think that the Everclear would pull more liquid from the fruit and give a deeper fruity taste after dilution to 100 proof but I'm not sure if there will be a difference between infusing in 100 Proof or 200 Proof. We shall see. At any rate, I saw that the Everclear batch was blanched out and the liquid was a very pretty red so I decided to decant that batch and dilute it. It smelled nicely of strawberries but was kind of harsh. Then I remembered that strawberry and rhubarb are often cooked together and this pretty baby was born.
Oh, what a delight this was! A Strawberry and Rhubarb Cordial! Sweet and tart at the same time. And a very pretty pink to boot! As I am diabetic I needed to avoid using sucrose to sweeten this, and it did need sweetening to bring up the strawberry flavor so I used only one drop of liquid sucralose.  The first sip was extraordinary. But then I got to thinking. I like my lemoncello straight from the freezer, perhaps this would be good cold. I added an ice cube and Voilá, perfection. The one drop of liquid sucralose was just enough sweetening without a bitter aftertaste and the ice made the rhubarb flavor pop. Of course, if you are not watching your sugar intake you can sweeten this with a simple syrup made from sugar and water in a 1:1 ratio boiled until disolved. I am very happy with this combination. After this sits for a month to mellow the Everclear this cordial combo should be sublime. I am so happy with this that I may make up more strawberry "tincture" and then use that to make up a medicinal tincture that tastes good, like Echinacea in strawberry.

STRAWBERRY RHUBARB CORDIAL
2T Strawberry vodka 100 proof
1T Rhubarb vodka 100 Proof
1 Dr. liquid sucralose

Sunday, May 18, 2014

Herb Classes in Dallas!

Herb Classes in Dallas!
 Hey there DFW folks. I'd like to announce my summer herbal classes for 2014.
Herbal Medicine Series
7 June It's only Natural! Herbalism 101
14 June Herbal First aid for Life's hard knocks
21 June Achoo! Herbs for Colds ad minor illness
28 June What do Women Want? Herbs for Women
5 July Making Herbal Medicines $40
12 The Beauty of Nature, Skincare and Herbs
19 July Booze you can Use: Elixirs, cordials and other Spirited delights -suggested donation $ 25
all classes $35 12-2pm
location in East Dallas, exact location will be given upon pmnt
 These classes will be a fun, engaging introduction to the world of herbal medicine and health in the Wise Woman Tradition. Come on out and you too could have your very own stash of stuff in jars!

Saturday, May 17, 2014

My latest creations are sitting in jars now, waiting to be decanted and enjoyed by my family and friends. I've made both tinctures and oils. My tinctures use dried plants of Yarrow and Damiana leaf and Milk Thistle Seed Powder. I usually don't like to buy pre powered herbs but I don't have a grinder powerful enough to grind milk thistle seeds and I've tried to make tincture from whole milk thistle and have been less than impressed with the results. I like the pre ground herb tincture better. Anyway, here is a pix of today's(yesterday's) creations. These things will be shown at my classes in June.
 Here are some oils I made, fresh rose petal oil and dried burdock root oil
and here is a photo of a failure. I tried to make dandelion root vinegar out of dried roots and I used too much root and it swelled up and sucked up most of the vinegar. I usually use about 1/3 jar of dried roots when I make vinegar and this time I may have used too much. Also it is hard to judge just how much the roots will swell in the vinegar. Oh well. Lesson learned here, I'll make another batch and squeeze this batch into it. No real harm done.


Monday, May 5, 2014

Roses Supposes.


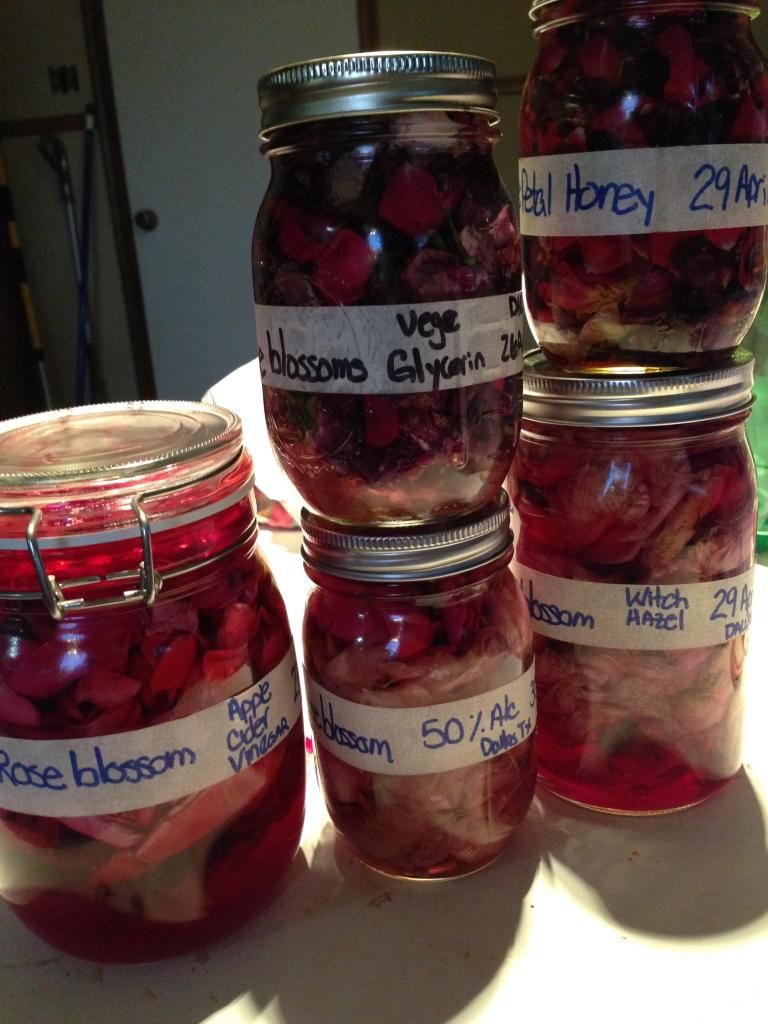
This is my Rosie goodness harvested from the rose bush on the side of my house. We have rose vinegar, rose glycerite, rose tincture, rose honey and rose witch  hazel.

I can hardly wait the 6 weeks needed for this all to steep.

Sunday, May 4, 2014

Stevia tincture. I think.

Here is hopefully a decent stevia tincture made from dried stevia.
I've filled the jar about 1/4 full with dried Stevia then covered that with 50% alcohol and water( 100 Proof). I'm going to let this sit for 6 weeks. I tried it today and I do have a sweetness in the liquid but also some grassy bitterness. This may go away in time or it may get grassier. We shall see.


Friday, May 2, 2014

Nettles!

Nettles! The essence of Spring. Rich , deeply nourishing and very defensive, Nettle emerges as the earth wakes from her winter nap and Screams "I'm Alive! Pay attention!" One of my favorite meals is a simple nettle soup made by tossing several fist-fulls of fresh nettle and 2-3 whole garlic cloves into a pot of boiling water, simmering the lot until tender then blending the everloving hell out of it. Eating this is like eating green sunshine after a month of cloudy days. Picking fresh nettle is also a deeply sensuous experience. You may not like it but I enjoy the occasional sting from Nettles. If I get careless as I pick her she lets me know she is noticing by a flick of formic acid on my skin. This sting reminds me to be mindful of what I am harvesting. The sting is not really so bad if you don't get too many at once. I even like the way the zap increases in intensity as the sun sets.
 Nettles is a rich source of protein, minerals and vitamins. I've used nettle as a foundation for helping me increase my iron reserves when they were low. Whenever I feel depleted, I turn to Nettle to nourish me to my core. Others turn to Nettles to help them deal with kidney stress they may be experiencing or allergic symptoms causing them difficulties. Nettles is strong enough to fortify my body while being gentle enough to drink or eat freely.
 Sadly, Nettle does not grow near me, I've invited her in several times but alas, my place is to hot and dry for her to be comfortable. I buy dried Nettle leaf from here:Pacific Botanicals . I make infusions from the dried plant. Infusions are super strong water extracts. This is no whimpy tea or colored water, this is deep nourishment. I put 1oz of nettle in a QT jar and cover with boiling water and let sit for 4-8 hours( overnight) then I strain the brew through a strainer and a muslin cloth. I use a cloth because the teeny tiny bits of plant that settle on the bottom of the pitcher get on my nerves when I swallow them. Some may not be bothered by them but they bug me. I drink my Nettle cold, either from the fridge or over ice. Once in a blue moon I'll drink it warm. When it's warm, it reminds me of soup.
 Notice all the plant material in this infusion.  Yummy nettle infusion.

Wednesday, April 30, 2014

DIY Vanilla Extract.

Today I put some of my homemade vanilla extract in my yogurt. Why am I telling you this? Because it was a divine experience, that's why. And I'm not one to keep the divinity to myself.
I've been working on a vanilla extract for some time now. Most commercial extracts contain glycerin or some other sweetener that i don't want in my food. So I began to experiment with making my own extract. My first attempt, which I don't have a pix of, was vanilla beans in Brandy. This was nice enough but tasted more like Brandy than Vanilla. It was just not what I was after. So I decided to try Everclear, since it has no real taste of it's own. In the following picture, look to the right bottom to see the Vanilla bean in Everclear project going on.
What I got was a clearish 95% ABV( alcohol by volume) that when diluted to 80 proof(40% abv) was milky and insipid tasting. See the jar on the bottom right with the vanilla beans in it and the diluted jar of vanilla everclear. In a word, it was gross.
 Then I thought about what I was dealing with. My vanilla beans were dried and needed reconstituting. So I tried a 50% ABV solution of Everclear and Water as seen below.
Now THAT'S what I'm talkin' bout!!!!
 This batch was dark and rich and flavorful. The beans needed the added water content to soften up so they could release their voluptousness and yield an extract to delight and satisfy in the strongest sense of the word.
Now you may ask how much vanilla did I use for this magical batch? Well I am not known for exacting measurements but I counted 7 whole vanilla beans in this quart of 50% alc. I broke the beans in half to fit them in the jar and let them steep. I put this up in November of 2013 and it is now May of 2014 and I have not removed the beans. They take up so little space in the jar that it is not worth it to take them out.
 This vanilla tincture, which is what it really is, is fantastic for baking and any use that calls for vanilla extract. In fact, you could probably use 50% less vanilla using this brew than a recipe called for.
 Here is a link to my source for vanilla beans:Grade B Bourbon Vanilla bean, .5#
 I can get Everclear at my local liquor store. 
Have fun with this.

Tuesday, April 29, 2014

Here are a couple of my most recent creations. I have a beautiful rose bush growing feral on the side of my house. She has always provided me with lush blossoms and vivid color in the Spring. Over the years I have lived here she has grown large and full and never failed to herald springtime in Texas except for the year my husband hacked her back to a stump thinking she was just some sort of weed. Just when I thought she was gone, she poked out suckers and grew back even larger than before with these HUGE thorns that seem to say " Hey buddy, try that again. I dare you." So now she gets free reign to put on her show in April and May and get's a hair cut in June.
What I have here in jars are two lovely concoctions using the blossoms of my rose. I've put up Rose in Apple Cider Vinegar and Rose in store bought Witch Hazel. Why would I do such a thing? Well, in addition to keeping her ruby hue with me all year long, Rose is an astringent, cooling plant. All members of the Rose family have that property. They are also rich in bioflavinoids and other elements of Vitamin C. This cooling, astringent quality is what I'm after in these preparations. The Rose vinegar is going to be used to help cool off the lighter skinned members of my family if they happen to get sunburned( I'm dark skinned and have only had one mild sunburn in my life so far). Diluted with water in a spray bottle, Rose vinegar spritzed on the skin provides soothing relief from the sting of a mild to moderate sunburn. And it smells pretty nice too.
The Rose Witch Hazel blend is going to be a facial toner for me now that I have reached a certain age. I could use the astringent, skin tightening effects of the rose as well as her cooling effects when I get those hot flashes that seem to be creeping up on me these days. This preparation I'll use straight up rather than diluted as a toner and diluted with Sandalwood Hydrosol as a hot flash spray.
For information on Rose check out this link :Botanical.com
And Kiva Rose had a great blog and information about the lovely Rose. Check out her info here:Wild Rose
 Well until I get to harvest more from my sweet backyard rose, Auf Wiedersehen!